Wednesday, December 30

Oh Joy: Scrapbook Layout


These last couple of years, I've really been trying to use up my stash before buying new products.  However, I'm not always successful.  There are just so many wonderful new releases every few months and I have weak moments! 

When this AC Amy Tangerine "Sketchbook" collection was released in 2013, I bought multiples of EVERYTHING.  I've recently gathered all the elements (ephemera, stickers etc) and papers into one bag, and I've been pecking away at "killing" it.  No sense in hoarding, as I need to make room for all the new goodies being released in January.

Here is my latest layout using the collection.  I also played around with my Cameo and cut this cute heart file from the Silhouette Design Store.  Filling in the background pieces takes some time, but I love that kind of mindless work while I watch one of my favorite TV shows! 

Thanks for stopping by!  Here's hoping the Stashbusting will continue in 2016!
Steph
xo

Tuesday, December 22

Foxy the Cat: Mixed Media Painting


This painting had so many different lives.  It began as a bunny with wonky ears, then covered with black gesso and started a new life as a fox... or a cat.  In all honesty, I was going for a fox, but it didn't quite work out!  Everyone I've showed this to says that it looks like a cat...I  guess I just can't help it!

Other then the fact that I tried to paint an entirely different animal and failed, I'm loving the look of this painting.  The background, texture and colors are lovely and soft in person. 

Foxy the Cat was painted on an 8x10 Wood canvas, using acrylics, ink, modeling paste and all the other usual supplies (punchinella, pen, tissue paper)

Sunday, December 20

Roxy Baby: Scrapbook Layout


Roxy is our 3 year old Silver Doll Faced Persian, and she is such a sweet little girl.  She loves to  fetch, and brings us her favorite foam balls when it's time to play.  She's lean and long, and has a fur coat that can mat after nothing more then a sneeze. 

Grooming her has always been a challenge; she's not aggressive, but sooooo squirmy!  She's also very smart, and knows that I'm a softy.  I let her get away with the wiggle worm routine and half heartily scruff her when I try and comb her out.  So after trying to maintain her fur on my own for about a year (and failing miserably), I asked our groomer to give her a lion cut. 

She didn't enjoy the process much the first time, but within about 5 minute of it being finished you could tell she felt so much better!!  No more mats and she started playing and carrying on like a kitten.  Since then, she is cut every every fall when the winter coat starts coming in... and she hardly squirms at all for the groomer now!

I still maintain her cheeks/tail/nails on my own, and she pulls the wiggle worm routine on me all the time, but I'm getting better at it!  Unfortunately, since I'm the "bad guy" in our house, she tends to ask Dave for snuggles and not me.  I can hold her and give her some love, she's such a sweetie... but I'm not her favorite.  It makes me sad, but I'll win her over one day!!

The layout was created using papers from Gossamer Blue, with some diecuts from Dear Lizzy and embellishments from Studio Calico.  I'm loving all things hand cut these days, scallop borders being my favorite!  (the wonkier the better!)

Hope you're enjoying the weekend!
Steph
xo

Thursday, December 17

Sweet Ralphie - Scrapbook Layout Process video


OK.  So I gave it a try.  I've uploaded my first scrapbook process video.  Disclosure: I am not doing anything mind blowing or new.  It's a layered mixed media layout using Studio Calico inks. 

After I posted a few layouts using this ink technique a couple of months ago, I had a few folks ask for details on the punchinella dots.  The layout is random, messy and full of hesitation... but that's how I roll!  I'm such a SLOW scrapbooker!  I tend to spend more time pushing paper around my table then gluing anything down... and in the end, they always look same. 

It is what it is, and I'm just going with it <grin>

Had lots of fun with this... and the only thing that was left out of the video what the bit of pen that I used to outline the page title and underline the inked journaling.

Have a look, let me know what you think!
Cheers,
Steph
xo


Supplies used
Foam title: Pink Paislee
Word stickers, vellum hearts, enamel dots and vellum letters: Studio Calico/Seven Paper
Yellow Washi Strip: AC Amy Tangerine
Black and White Washi: A Beautiful Mess
Michaels Dollar bin Alpha stamps

Wednesday, December 16

Cards - TAWS Bird brain


I love the idea of making cards.  I can spend hours watching YouTube videos about making cards, and drooling over online card galleries.  I even have my own Pinterest board to ensure inspiration is at my fingertips!  I've even taken a Copics coloring online class to justify all of those yummy markers I have in my stash.  All of this, and I just can't seem to get the hang of it! 

Every single time I sit down to make a card, I draw a blank.  I don't know if it's the smaller canvas that intimidates me, or that my coloring doesn't ever look as nice as I would like it to look.  I'm not certain, but the creative struggle is real.  <grin>

However, it's that time of year when I attempt my hand at making a stash of cards for my Mom using my leftover scraps.  I dug out my stamps, markers and card stock and had a bit of fun last weekend.

This is my favorite card so far, mainly because of the cute little bird.  The stamps are by The Alley Way Stamps and the set is called "Bird Brain".

Am I the only one who struggles this much with cards?  Give me a 20x24 blank canvas and I don't even blink... but these tiny cards just mess with my head!  LOL

Hope you're all having a great week
Steph
xo


Thursday, December 10

Yellow Stripes & Kitty - Twinkling H20 Process Video


Ahhh yes, another kitty watercolor!  I just can't seem to get enough of drawing these cats!  I used Twinkling H20 watercolors again, my absolute favorite paints.  They are so creamy, bright and shimmery!

The pen that I use is a discontinued Pilot Permaball Pen, when I found them on sale a few years ago at the local art store, I was so thrilled I bought the entire lot.  I'm not sure what I'll do when they are all used up, but hopefully I won't have to worry about that for some time.

The watercolor pooled here and there on my paper, but that's all part of the learning process.  When I do these sketches and paint them with various watercolors, I really try not to over think things, just do what feels right and let the water do most of the work.  I am not seeking perfection, thank goodness!

The scribbles with ink really help me let go and get over the perfection angle as well.  I know some may look at my work and think "why the heck does she do that?!"... it's just my way of letting go. 

Some days I let go a little too much, and that's ok... a few of my favorite pieces (and my best sellers in my shop) are the paintings that I did on a whim with no thought of the end result.

Here's the Process Video for this watercolor, hope you enjoy! (and yes, next time I paint a bunch of tiny flowers, I will speed up that section of video a bit more LOL)

Steph
xo


Tuesday, December 8

Banana Phone - Scrapbook Layout


This catnip banana toy was the best money I've spent in a long time!  Luna just loves carrying the thing around the house, from one room to another and even up and down the stairs!  It's a bit awkward for her, but oh so cute! 

She is the most playful cat!  She's just turned a year old, and I don't see her slowing down at all.  She plays fetch at least once a day, always chirping at me whilst dropping her furry mice at my feet.  She is so adorable and quite the character!

The scrapbook layout is just a bunch of scraps from one of my Studio Calico kits (or perhaps a combo of a few?) and a few items from my stash.  I'm still on a layering/sewing/pops of yellow kick... and I don't see that changing for awhile yet!

I usually like my stitching a bit messy and random, but this time I just did some simple straight lines, to add texture to the layout and to ensure my chipboard Thickers stay on the layout 10 years from now!

Thanks for stopping by!
Steph
xo

Thursday, December 3

Bandit the Dog Twinkling H20: Process Video


OK. Full disclaimer.  I love dogs.  I know, I know... my website and everything that I post here is usually all about cats.  I understand your confusion.

Growing up, my Dad and Sister were allergic to cats, so we were never able to adopt any sweet kittens (no matter how many times my sister tried to sneak the neighbours cats into the house and hide them in her toy box. True story.)

So we always had dogs (and a cockatiel, 4 turtles, 3 hamsters, 2 salamanders)  My entire childhood can be time lined by the dogs that were part of the memories, which is really quite lovely.  Sox, Trousers, Elizabeth, Dino, Daisy and Michaela.

Here is my very first attempt at sketching and painting a dog.  I see so many things I don't like about it, however I am so happy that it actually LOOKS like a dog and not a cat!  Earlier last week, I tried a mixed media Fox, and it turned into cat instead! (I'll post about that in a few days).

Here's the process video, using Twinkling H20s.  Hope you enjoy!
Steph
xo


Monday, November 30

Flower Kitty: Gouache Process Video


Here's another new media for me: Gouache paint!  It's essentially an opaque watercolor, and there are some pretty amazing colors out there!  I picked up a cheap set of 12 at Winners, and splurged on my one tube of Windsor Newton Opera Pink.  This one tiny tube of pink cost  more then the entire color set from Winners, but I couldn't resist.  It's such a beautiful pink!

What I love about gouache is that it reacts to water, but has more coverage like an acrylic paint.  It's a change from a transparent watercolor palette, and I like having the variety in my studio depending on my mood. (although I think I'll stick to my cheapo paints for now, I'm not ready to invest in better quality paints just yet)

I recorded a process video since it was my first kick at the can, hope you enjoy!
Steph
xo


Thursday, November 26

A Look Into My Creative Space


My scrapbook space is located in the basement of our house, in what most would call their "Rec" room here in the maritimes.  It's quite a large room, and my area takes up a little less then half of the space.  I moved in with Dave in 2009 and my scrapbook area has slowly crept from just one desk and a flimsy shelf, to two full office desks and lots of organizational furniture! 

I'd love to take over the other half of the room, but alas, our house is a small one and so the other half is used for miscellaneous storage and things like a piano, grooming bench for the cats and a treadmill.  It's the catch-all area for things that don't have a proper place in our home.


On one of the smaller walls, I have a section of white pegboard that helps me keep my embellishments organized.  I try and keep things out in the opens as much as possible, because I need to see it to use it on a project.  In the past, I've organized supplies in drawers, and forgot what I had in my stash, and sometimes bought duplicates!


One of my most favorite pieces in the room is this quote from Joss Wedon.  It was part of one of this year's ABM Happy Mail kits, and I just love it!  The fact that it was hot pink was just icing on the cake!


Above are the workhorses in this space: 3 Ikea Expedit shelves (renamed Kallax) and the Raskog carts.  The shelves are a lifesaver, and really help me keep my various hobby supplies organized.  You see, I don't only scrapbook, but I make jewelry, sew, paint, knit/crochet and cross stitch as well.

The two Raskog carts are filled with Mixed Media supplies, Project Life cards and most of my cling stamp collection (organized by manufacturer in Avery Elle Sleeves in the pink containers).  I love being able to wheel these around as I need them.

*Disclaimer: there are 3 paintings on the top shelf: girl holding kitty, Hawaiian girl, and girl lounging... that are inspired by one of my favorite indie artists: Tascha.  They are total copies of her work, no original thought at all!


In the above photo you can see the Michael's cubes and Ikea Alex storage cart, along with a very helpful Luna and Athena lounging on my main desk. The cubes are handy, but I would not recommend putting anything really heavy in them as they aren't very durable.  Dave has had to reinforce/reattach almost all of those drawer handles for me over the years.  The Alex cart to the right is awesome, and I wish I had the money to have 10 more of these! 


I have a LOT of things in this small area.  Almost all of my crazy is on display here, and I tend to leave the rest of the house somewhat grown up (well, for me anyway!).  This is my 0.0.0.0, where I love to be creative and most importantly, be myself.  What better way to find inspiration, then to surround yourself with things that you love and make you smile!

I've always been a collector, and having a few of them on display in my scrappy space is lovely.  The Smurf collection began in 1982, most of those figures are original from my childhood.  I also have Strawberry Shortcake dolls, Mr Potato Heads and my Blythe dolls. (The Super Mario belongs to my step son who just turned 16.  He didn't want to give them up just yet, and suggested I put them up on a shelf for safekeeping.)

I also have a many Buffy the Vampire Slayer figures and collectibles, but they are so delicate I haven't found the appropriate solution to display them where they would be safe from the cats explorations and antics.  


Well, there you have it!  My creative space in all it's cluttered organized glory!  The secret to keeping this much stuff manageable is to 1. Use what you have 2. Clean up after each project 3. Purge your supplies at least every 6 months. 

I hope you enjoyed my mini tour! 
Cheers,
Steph
xo

Wednesday, November 25

You Are... Adorable: Scrapbook Layout


This sweet girl cracks me up!  Luna is still consumed with the joy of being a kitten, and this photo really shows her funny side!  She gets so wound up when it's play time, that "look" is what happens... she's so intense!

Her first Birthday was just over a month ago, and I don't see any signs of her energy slowing down!  I've heard that Ragdolls don't reach full maturity until they are 4 years old, so we may still have quite a few shenanigans left!

The layout was created with a Studio Calico kit, and again with the layered rectangles and borders!  I swear, I don't do it intentionally... it's just what I like these days!  I think it may be time to dig out my Silhouette machine or at least my circle template and punches!  That would certainly help change things up for me!

Cheers,
Steph
xo

Monday, November 23

So Cute: Scrapbook Layout


Ralphie is such a dream to photograph!  His personality is very calm and relaxed, so even if he isn't snoozing he's fairly easy to capture.  However he doesn't always look at the camera, so I tend to have a wand toy handy to get his attention.  When he's being particularly cute (in good lighting of course), I take about 10-20 photos and this *usually* guarantees me one in focus shot. 

The layout is my usual "layered rectangle" style with borders.  I know, I know, I'm getting tired of it too... but its what suits my mood these days.  The supplies were from an older Studio Calico kit (Odyssey) I think) and I wish I had 100 of those kitty wood veneers!

Thanks for stopping by!
Steph
xo


Sunday, November 22

Studio Calico Color Theory Ink: Process Video


The Studio Calico Color Theory Ink refills have been on my wish list for quite some time, and I finally managed to snag the collection during a sale last month! I had seen how others have used it on their scrapbook layouts instead of traditional watercolor washes, and wondered how they would fare if I used them for one of my cat watercolor sketches.

Whenever I want to test anything new, I always go to my default project: Cat sketching!  I just can't help myself, and I've decided not to fight it.... it's what appeals to me, so why not!?

Similar to watercolors, the color vibrancy for the inks vary depending on how much water you add to the ink drops.  Also, the working time is also very limited with these inks,  you can't linger or over think anything.  

I struggled a bit at first with the limited working time (in the video, you can see what happens when I'm adding color to the grey kitty's forehead), however it didn't take me long to gauge how fast I had to work.  Although, I do need to be a bit more careful when I'm working that fast as things tend to splatter around if I don't pay attention.  That's a Stephanie problem though, no fault of the ink ;-)

Thanks for stopping by!
Steph
xo

Friday, November 20

Luna the Bunny: Mixed Media Process Video


I was reluctant to even post this video, because you see... Luna the Bunny doesn't exist anymore.  The day after filming, I just couldn't get over how her ears weren't right.  She just wasn't what I had intended, and the following day I covered her in black gesso.  Do I regret it?  Maybe a little bit, because in hindsight, she is cute in her own way I suppose.

The biggest surprise and the most wonderfully unexpected result of filming my creative process, is seeing where I went wrong (for me... as there is no right or wrong way to create!).  After editing the video, I re watched it, and I could almost pinpoint EXACTLY when I overworked the piece and turned it into something I didn't like anymore.

This is such a wonderful learning opportunity, and if I hadn't recorded the process, I would never have figured out: STOP IT WITH THE INK ALREADY!

There, I got it out of my system and put it out there... now only if I can remember this the next time I get messy and play in the studio :-)

Here is the process video, hope you enjoy it!


Products Used:

8x10 wooden board canvas
(I covered it in Black Gesso before the video)

Misc Acrylic Paints
Liquitex Matt Medium
Sharpie White Paint pen (fine point, water based)
Liquitex Modeling Paste

Hard Foam Stamps
(handmade with kids craft items at Dollarama... feels like mini pool noodles!)

Foam/Sponges
(recycled electronic packaging, instead of foam brushes)

Misc Stencils
Bamboo Pen
Glass Pen (Gypsy Road)
Punchinella
Stabilo Pencil
Bubble Wrap
Spectra Art Tissue Paper


LCOM Crop - One Hour Challenge: Scrapbook Layouts


I was in Moncton recently to attend the LCOM Fall crop with the lovely Kristine!  We had so much fun catching up and playing with paper.  We haven't spent any time together since the Spring, so it was a much needed reconnect! 

The crop had two "One Hour Layout" challenges, and I had great fun with the sketches provided!  Having limited time, and limited supplies (since I'm not in my scraproom), really takes the pressure off.  It's a bit surprising, because you would think otherwise.  However, it really forces me to stop over thinking every darn enamel dot placement and to "Get 'er Done!"

The first layout above was a cool chevron sketch, and I used Crate Paper's Wonder collection.  I believe it's meant to be a baby collection, but with all those cute little kitty faces on the paper and embellishments I couldn't resist!

The second layout was a layered layout using Studio Calico's Baxter collection, and I'm still not sure about that pop of yellow... but I'm leaving it in there anyway.  That's what this is all about, to stretch your creativity and get you out of your comfort zone.  I probably would never use this color combo again, but that's ok! 


Thanks for stopping by!
Steph
xo


Thursday, November 19

Rosie Posie: Scrapbook Layout


I'm continuing my Stash-busting journey this year, and so far so good!  I have so many beautiful paper collections that are piling up, and I really would love to use them up before the new trends hit the streets!

The paper collection is an older one from Amy Tangerine, and I just love it!  I thought it was a perfect fit for photos of our foster kitty Rosie sitting on my hot pink chair.  The layout itself is slightly light blasted, as I wanted to be able to SEE Rosie's face!  Who knew that black kitties were so difficult to photograph?  I sure didn't!

The journalling was done with my favourite dollar bin stamp set.  I'm not a big fan of my hand writing, so these come in handy.  (and I love the look!)  It makes a nice change from the typewriters, as I can stamp directly on my layout as opposed to making journalling strips.

I miss this beautiful kitty so much, and we are still her "back up plan" if things don't work out in her happy new home. The experience was a bit of a heart breaker, I found it so difficult not to get attached when they are this sweet!  (Dave chose not to spend hardly anytime with her, he knew it would be difficult to say goodbye otherwise)

However, we would do it all over again: she's happy, healthy and so loved in her new forever home.

Steph
xo

Wednesday, November 18

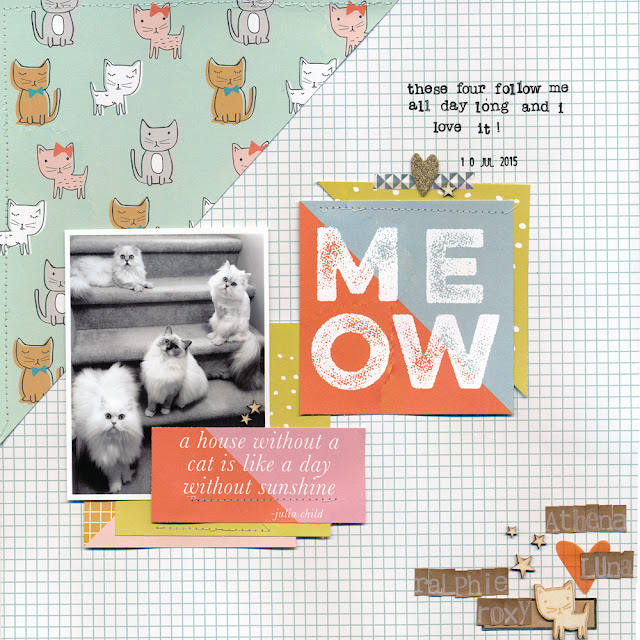
Meow: Scrapbook Layout


These four furry critters crack me up!  I often feel like I'm part of a never-ending Conga line, and I love it!  Sure they are underfoot, and I have to watch out that that I don't trip over them, but having  their company in the house is so lovely.

All four cats are VERY different from each other, and they all show affection and cuddle in different ways.  However, they are all so social they can't help but follow me around the house even if it's just to the washroom and back!

I scrapbooked this favorite photo with a lovely collection by Studio Calico's Seven Paper.  I think it is hands down, my favorite release of 2015.  I love that it's all about cats/dogs and in a pastel palette!  Often pet lines are in browns and oranges and I just find those colors difficult to work with as I'm still on my "bright" kick.

And the kitty wood veneers?!?  I may have ordered about 10 packs of those, I never want to run out!

Thanks for stopping by!
Steph
xo

Tuesday, November 17

Château Frontenac: Scrapbook Layout


Last month Dave and I drove up to Québec city for my Birthday and stayed at the Château Frontenac.  What a treat to celebrate my 41st in a castle!

One of my oldest and dearest friends lives in the city, so it was lovely to visit with her and her husband and their 3 cats.  Guylaine and I went through our teen years together,  and she's been there for all the heartbreak and triumphs that the age entails.  The history that we have is palpable.... and when I go too long without speaking to her, the disconnect doesn't sit well within me. 

Spending time with loved ones who accept you, with all your flaws is good for the soul.  I find that as an adult, I spend so much of my time explaining my behavior, and trying to ensure that I'm doing right by so many people, friends, family and coworkers. 

Some days, you just need to chill with the gal that has stayed up so many nights dreaming with you about how our lives would be like when we were old enough to be on our own... she knows your intentions, she knows your heart.   And in turn, you know hers and love her all the more for it.


Monday, November 16

BlueBelle the Bird!: Mixed Media Process Video

3 weeks.  That's all it takes for me to be out of practice.  I need to remember this, to help me stay focused and maintain my motivation!  Life just got busy this fall and I spent more time in Photoshop then creating and getting messy.  I must remember to find that balance!

I'm not sure how to explain it, but my spirit feels so much better, sated even, when I find the time to create something.  My mind is always thinking of things to do next, things to create, that if I don't try and make one of these ideas a reality every now and again, I feel antsy. 

Here is my latest mixed media piece, BlueBelle the Bird.... she just makes me giggle!  I love this cartoony style, and I hope to make a few more characters (non bird like) with the same googly eyes soon!

Here is the process video, and the Original painting is for sale in my shop!  Thanks so much for visiting!

Products used:

8x10 wooden board canvas
(I covered it in Black Gesso before the video)

Misc Acrylic Paints
Liquitex Matt Medium
Sharpie White Paint pen (fine point, water based)

Hard Foam Stamps
(handmade with kids craft items at Dollarama... feels like mini pool noodles!)

Foam/Sponges
(recycled electronic packaging, instead of foam brushes)

Misc Stencils
Bamboo Pen
Glass Pen (Gypsy Road)
Punchinella
Stabilo Pencil
Bubble Wrap
Spectra Art Tissue Paper
7Gypsys Tissue Paper


Sunday, November 1

Grand Opening! The Creative Cat Lady Shop!


I'm so excited to finally share with you what I've been working on for months!  My own little Art Print shop, full of bright colors and cute funky characters! 

Eventually, the shop will be a combination of Art prints, Original pieces, along with perhaps a bit of funky silver jewelry... but for now I've only listed a few prints.

I've been saving up for months and months to purchase the equipment required to print at home, and I'm just tickled pink that it is finally a reality.  The equipment and software were just the stepping stones... getting the proper scanning and Photoshop skills in place were a bit more of a challenge! haha! 

What a great learning curve though, I love that "outside of my comfort zone" feeling... when you take the time to learn, challenge yourself to just dive in!  I've learned more about Photoshop in the last 2 weeks, then I have in the last 8 years I've owned the software.  The best part, is that I think this may change up my photo printing for scrapbooking as well!  Yay!

Please drop in and check out the shop, let me know what you think!
Cheers,
Steph


Wednesday, October 21

Twinkling H20 Process Video: Cat in the Valley


I love adding context/scenery to my kitty characters!  Here is a little Bengal kitty taking a stroll in a valley.  One day I'd love to draw a mini story/adventure, with a sequence of watercolor kitties.... but I need to learn how to draw different body poses for variation and interest.

I've been reading a book on perspective drawing this week, so hopefully this will get the ball rolling on that skill set.   

Here is the process video for my little spotted Bengal kitty... and you can see that I'm keeping it real!
I messed up when adding my ink, and I included my "fix" in the video. 

Making mistakes is all part of the learning curve, and for the first time in my life, I am embracing them.  The more mistakes I make along the way, the more interesting this adventure becomes for me and the more progress I make with my artwork.

Enjoy!
Steph
xo


*Supplies used: Twinkling H20s, Ink and Canson 140 Lbs watercolor paper


Monday, October 19

Guest Blogger: Canadian Scrapbooker Magazine


I'm so thrilled to be a guest blogger on the Canadian Scrapbooker Magazine today! 

There are a couple of new Scrapbook layouts using some Echo Park and Studio Calico collections, and a bit about my new process video adventure.   Please pop over for a visit!

Steph
xo


Thursday, October 15

Process Video: Twinkling H20s and Arches Watercolor Paper


I've been trying different types of watercolor paper to use with my Twinkling H20 paints, and I think I have found my favorite so far: Arches Cold Pressed 140lb 100% cotton.  I think it may still be a student grade paper, as it was the least expensive of the Arches papers (mind you, it was a pad of only 12 sheets!)

I was really interested in trying out something that is 100% cotton, and was curious to see how the Twinkling H20s react to it.  I was having "blooming" issues with my black Twink paint when using the Fabriano Hot press papers, and I thought perhaps it was a wonky reaction due to only being 25% cotton.

Here are the results, and I have to say I really enjoyed these papers! They were much rougher than I expected, but I didn't mind it... It's not like my work has super fine details that would be hindered by the texture :-)  I loved how the paint dried without pooling too much, as I tend to be heavy handed with the water. 

Here's a quick process video, hope you enjoy!
Steph
xo


Sunday, October 11

Mixed Media: Funky Feathered Owl YouTube Process Video


This feathered friend was such fun to make!  I struggled a bit with the background, but all in all I am pleased with how it turned out.

I bought some new supplies last week and wanted to give them a try, however I think I need to spend some time using them on a Bristol paper piece before using them on a canvas again.

The Golden Fluid Acrylic paints were lovely, but I need to get to know their properties and how best to use them.  I have a few more colors on their way to me next week, so I will be sure to spend some time playing once they arrive.

The oil paint sticks were a bit tricky, and not at all what I expected.  I think they would have done better on a smoother surface to begin with, rather than my textured star background... but again, I need to play and get to know their properties.  I forgot to prepare them before recording the video, so my apologies for the struggle captured when I was trying to remove the "skin" before using it! LOL

I used a ton of ink on this fella, I just can't seem to help it these days!  I love the messy, inky, scribbled look!  Going between the bamboo and glass pens really gave me a variety in line definition, and I had so much fun!

Here is the process video, hope you enjoy it!
Steph
xo


Supplies used:
8x8 Gesso Canvas
Misc Paint brushes
Foam (recycled electronic packaging, instead of foam brushes)
Liquitex Black Carbon Ink
Punchinella
Bubble wrap
Misc Stencils
Gallery Oil Pastels
Windsor Newton OilBar (White)
Maya Mist (Lime Metallic)
Mr Huey (Banana Stand)
Stazon Ink
Tim Holtz Rubber Stamps

Glass Pen Handmade by www.etsy.com/ca/shop/GypsyRoadCanada


Saturday, October 10

Tuxedo Kitty Watercolor - Twinkling H20


Some days you just need to get it down on paper.  No thought about your end result, just pick up that pencil, pen, paint or whatever you need to express yourself. 

I've been trying to sketch or paint something every day.  It isn't always easy to squeeze in, and some nights I'm scrambling during the last few minutes before bed to put a doodle to paper. 

However these quick drawings feel wonderful, even if the sketch is crap.  (and many of them ARE crap!)  This aspect of practicing my creativity surprised me; these bedtime sketches calm my mind, sate that need to "make something" and helps me improve every day! 

A concept so simple, and so obvious!  I know it sounds so corny, but I feel like this is such a lovely new chapter of my creative self. 

Steph
xo


Wednesday, September 30

A Clowder of Cats in Pencil Crayons


One of the things that I love to do when trying out a "new to me" product, is to draw a cute group, or clowder of cats and color them in!  So far, I've tried it with various watercolor products, Distress markers and I'm currently working on a large piece with my Faber-Castell Gelatos.

Here is my favorite clowder so far using Faber-Castell Polychromos pencil and Gamsol on 11x14 Bristol paper.  I've tried other "high end" pencil crayons before, and wasn't very successful; the leads kept breaking when I was sharpening them, and most are all down to nubs after using them for only a short time.

The Faber-Castell Polychromos pencil crayons are a dream to color with!  They can be sharpened to a nice fine point, and they lay color down smoothly. I'm still learning about shading, and I find these cat collages are great practice.

Gamsol was used to blend the pencil marks with a paper stump. (Be sure to use Gamsol in a well-ventilated area)  It took a few cats to get the hang of using it, but going in a circular motion seemed to work the best.

The paper stumps have to be sanded down after every color, so it does make a bit of "dusty" mess in your work space.  Be sure to have your dust buster handy if that bugs you!

Have you ever used Gamsol?  Any tips/tricks are welcome!
Steph
xo

Tuesday, September 29

Scrapbook & Cards Today Fall Issue and a Double Layout


Have you downloaded the latest copy of the Scrapbook & Cards Today issue?  If you haven't,  I suggest you click here and do it now!  It is a wonderful issue with so much inspiration! They knocked it out of the park again and I can't wait to receive my paper copy in the mail soon.  There's just something I love about a printed copy in hand (I'm old school I guess).

I was thrilled when they asked me to contribute to their Pet Feature, and thought it would be the perfect time to create a layout featuring ALL 6 CATS!  Yes, you read that correctly... I had yet to do this with our new gang!

*The last time I did this, was with my old gang in 2008

I pulled out my American Crafts Shimelle collection and created a double layout.... because when you have 6 cats, you need a double layout to accommodate them all!


I struggled with photo placement on this one, but I think that has more to do with the fact that I'm not used to scrapbooking more than one photo at a time.  I wanted to be sure all cats had equal focus, and I think I was successful.

For those of you who are new readers, 6 cats really isn't a lot once you get used to it.... For a short time before we adopted the Persians we were down to 3 and the house was so empty!!   I could do without the fur though, thank goodness for a robust vacuum cleaner ;-)

Thanks for stopping by!
Steph
xo

Monday, September 28

Watercolor: Tortie Kitty Love!


Here is the latest kitty doodle!  A 9x12 cute Tortie, inspired by our beautiful cat Summer Girl.
(aka Summer Lovin', Summer Breeze and Miss CrankyPants...LOL)

This was my first time using Watercolor Paper: Fabriano 140lb Hot Press, and I really enjoyed it!

If you are unfamiliar with the difference between Hot and Cold pressed Watercolor paper, it's very simple: Cold=Textured   Hot=Smooth
(I'm sure there are other variables that distinguish them, but I'm still learning)

The paint and water flow differently when you're working on a smooth surface, so I'm sure there will be a bit of a learning curve while I work through the paper pad.

Along with the Fabriano paper, I used my lovely Twinkling H20s and favorite Pilot pen.  I still can't seem to leave the dark pen marks off my page.  I love the soft watercolor look on other artists work, but I never feel like my pieces are finished until I messy mark them up with black!

Until next time!
Steph
xo


Saturday, September 26

Scrapbooking with Echo Park

Over the last few years I have been trying to make a real attempt at using up my supplies, rather than hoarding saving them for a rainy day.  It's not always easy with all the new goodies that are released a few times each year, but I'm getting better at it!

Stashbusting has been my term for using up what I already have, and that's what I've been doing lately!  Stashbusting up a storm!

A couple of weeks ago I dug out a lovely Echo Park collection that was released a couple of years ago, and here are two of the few layouts I created.  I almost "killed" the entire kit!  What a great feeling to use up your supplies :-)

I've been working on a lot of mixed media projects lately, and I guess you can tell by the layouts below!  A bit of hand cut scallops on the first layout, and lots of ink on the second!  I also dug out my favorite old mini alpha stamp set for the journaling.  I love that look! (especially since I'm not keen on my own handwriting)

Thanks for stopping by!
Steph
xo


Monday, September 21

My First attempt with Gelli Plate Mono printing!

Mono Printing has always been a bit of a mystery to me.  I've always loved the results, but never really thought much about what it takes to get <great> results.  After watching the Gelli Arts YouTube channel for a few days, I thought I'd like to give it a whirl and picked up an 8x10 plate at the local art store. 

Below you will see my entire process, creating 8 individual prints in about an hour.  It was so much fun, I could have continued on all night but I had dinner plans!

Here is the YouTube Process video, from start to finish... you see all of my attempts at mark making, wonky color combos and a few mistakes  learning opportunities here and there.


Lessons Learned:
 - Brush up on color mixing to create a pleasant palette
 - Have more paper towels handy to clean your brayer
 - Keep the plastic protective backing on the Gelli Plate...
(otherwise it will warp your lovely silicon mat)
 - Have more paper shapes/stencils on hand for a better variety

Here are the end results of the hour I spent getting messy with the Gelli Plate:


I have a few favorites (the top one especially) and I think the last one is a dud... but I'm sure I'll find a use for all of them in my mixed media projects.  

Supplies used:
Misc Acrylic Paint
Smooth Heavy Drawing paper (8.5x11 135lbs)
Gelli Arts Printing Plate (8x10)
Plain card stock for my homemade stencils (randomly cut out)
Brayer
Punchinella
Silicone cooking utencils (dollarama)
Lots of Baby Wipes!

Steph
xo

Friday, September 18

Mixed Media: Owl & Ink on Bristol Paper


Some days I just feel like getting my fingers full of paint.  No plan, no clue of what I'm going to put to paper... but it doesn't matter.  I just need to play!  Bristol paper is wonderful when you're feeling like getting messy, but don't want to commit to an actual canvas.

I had never heard of it until recently, and I'm so happy I did!  It's thick paper that can withstand a lot of heavy mediums like acrylic paint, modeling paste, decoupage glue and ink etc.

I pulled out my Bristol paper pad, turned the camera on and just went with it.  Of course, my go to paintings are usually cats or owls these days....so I figured I'd stick with what I enjoyed.  Here's another owl inspired by Juliette Crane (If you haven't taken any of her classes, I highly recommend them!)

If you watch the video below, you will notice toward the end I'm using a beautiful glass pen.  I wanted to make special mention of it, as it is handmade by the lovely Janelle at Gypsy Road Canada located here in Halifax.

These glass pens are incredible!  I'm using the thin width in the video, but I also have another with a thicker tip.  They are wonderful with ink, and I've even used them with my Studio Calico Mr Hueys and other mists.   I think they are the fanciest art supply I have!

Steph
xo


Here are the supplies used in the video:
11x14 Bristol Paper
Misc Paint brushes
Foam (recycled electronic packaging, instead of foam brushes)
Liquitex Acrylic Paint
Grumbacher Paint
Stabilo Pencil
Liquitex Modeling paste
Liquitex Black Carbon Ink
Punchinella
Bubble wrap
Tim Holtz Stencil 
Tissue Paper
Golden GAC 100
Liquitex Matte Medium
Foam Roller


Wednesday, September 16

Scrapbook Layout: Family Fun with a Selfie Stick!


Like most families, when we gather together we are a flurry of non-stop stories, conversations and catching up.  Too many times I find myself on the road home, face palming because I forgot to strong arm them into a group photo!

So at the end of our last gathering for my Dad's birthday, I made sure we grabbed a quick informal photo with my selfie stick!  These often intrusive devices come in handy for family photos... no one is left out and no need to set up a tripod!  (It helps that my brother is super tall LOL)

Is it perfect?  Of course not!  But I love it!  We are all staring into the sun, blinding ourselves, Rohan even has his eyes shut tight... which I find so cute!  It adds character to the photo, and I love that we captured our fun weekend.

Does your family enjoy taking group photos?  Or do you have to bribe and coerce them like I do?

Steph
xo


Monday, September 14

Mixed Media Cat: A Video, a few Lessons Learned and lots of Ink!

You know that feeling that you get after you've made something, and you aren't really sure if it's any good or not?  You *kind of like* how it turned out, but then you take a step back and you end up hating it... and then loving it, and then back to hate.  So you turn your back to it for a few seconds, and then hope that the next time your eyes fall upon it, you'll be able to look at it objectively.  (which NEVER happens)

I'm not sure if I love this cat painting, or hate it.  All I know at this point is that I'm so happy I recorded it!  I can pinpoint the EXACT moment when I strayed from what I wanted to create.  I sat down with an idea in my head, of the "look" I was hoping for, and I went in a completely different direction at around the 5 minute mark in the video.  That's when I stopped liking it, but figured I'd just go with it.  Let go and enjoy getting messy. 

I'm still very new to creating Process Videos and uploading them on YouTube.  I love the idea of documenting my projects as I explore different ideas and figure out what technique, medium or products I prefer.  I love how recording my process helps me push forward and not over think my every action.  So refreshing!

I won't always love what I create, but I will always love each moment spent in the process!  Moving forward, exploring and having fun! 
Steph
xo


Supplies used:
8x8 Canvas
Acrylic Paint by: Golden, Pebeo, Liquitex
Liquitex Modeling Paste
Liquitex Ink
Liquitex Matte Medium
Golden GAC 100
Colored Tissue Paper
Cray-Pas Oil Pastels
Misc Stencils
Bamboo Pen/stick